In my past entry, I talked about my baby DIY projects. I made a 2-in-one maternity nursing pillow and it was super comfortable! Now, since it made me very very happy, I would like to show you how I made it. If you are farmiliar with most of sewing technicals, this will be easy and simple to understand. For beginners, I’m sure you can do it too, although it may be a bit of a challenge to understand.
Before we begin, I would like to apologize for the poor image quality. It was middle of the night and I was too flustered to check the images I took. Or maybe it was just the preggo brain. haha
Anyway, let’s get on with it, shall we?
Part 1: Drafting the pattern
What you’ll need:
– Paper for drafting
– Blue and Red pencil
– French curves
– L-shaped ruler or quilter ruler
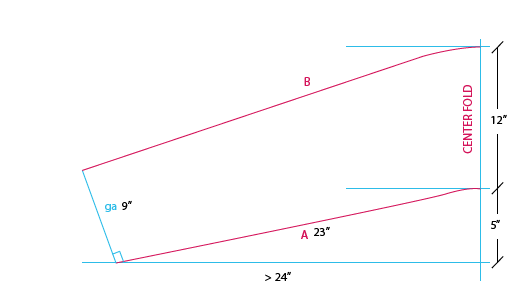
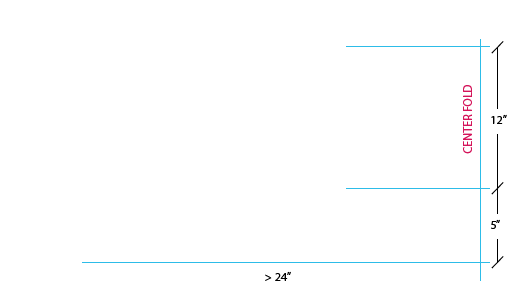 Step 1: Draw the guidelines as above. Let’s call the vertical line the center line as this will be the fabric fold when you cut your fabric later. Then, draw 3 horizontal guidelines as above. For this one, the middle width is 12″. If you want your middle to be wider, now is the time to add to the 12″. Try to maintain the 5″ as that will be the angle of the “boomerang” shaped pillow.
1. Now, draw line A (red colour) and create a slight curve at the center. Ensure that the line ends on the third guideline, whether you decide to make it longer or shorter. I made mine 23″ because my pregnant belly measures 44″ (I’m at 35 weeks at the moment).
2. Create a new guideline, ga. For mine, I made it 9″. You can make it same width as the center. I tapered mine so that I can tuck it under my belly and/or boobs as that’s how I find it comfortable.
3. From the end of guideline ga, connect to the center to create line B.
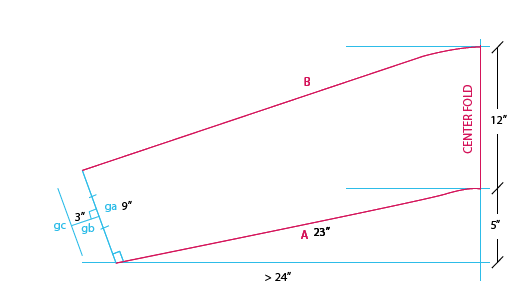
1. From line ga, find the midpoint and draw 3″ perpendicular line.
2. Draw another guideline, gc, perpendicular to line gb, thus parallel to like ga. The length of this line does not matter as it is only a guideline.
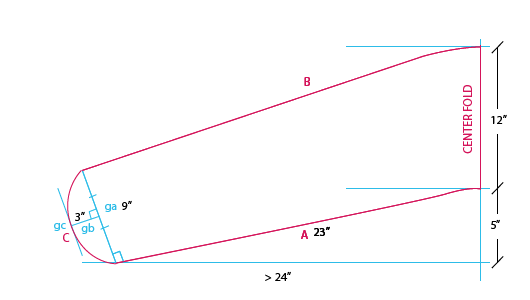
Step 4: Draw a curved line C, connecting end of line A to B. The intersection of line gb & gc will be the midpoint of the curved line C. As you draw the curve, try not to go over line gc for the sake of symmetry.
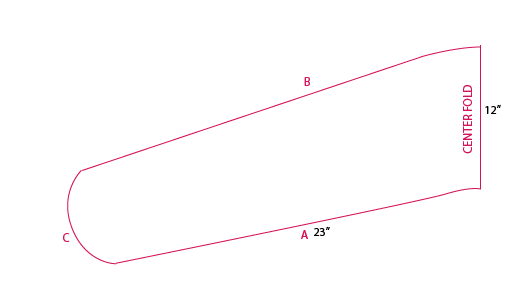 Now, this is what you get! Your very own maternity/nursing pillow.
Part 2: Making the pillow
You’ll need:
1.5 mtr of cotton fabric (for 45″ wide or 1mtr for 60″ wide)
Stuffing of your choice. I used less than 1/2kg of fibre filling because they are softer.
Step 1: Lay out the pattern on fold and cut your fabric with 1/2″ seam allowance.
Step 2: Sew your fabric with 1/2″ seam allowance, leaving a hole in the middle. Turn your fabric and stuff your pillow.
Step 3: Close the hole with a strong hand stitch.
Part 3: Making the pillow cover
You’ll need:
1.5 mtr of cotton fabric for 45″ wide (or 1mtr of 60″ wide)
Thread
Cutting the Fabric
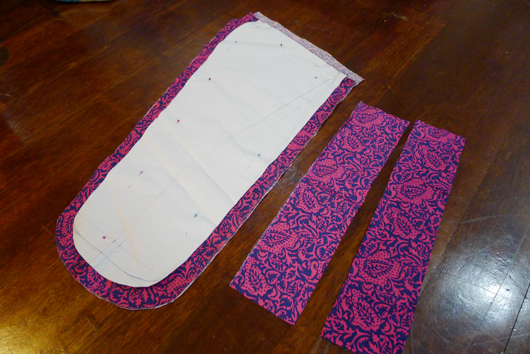
Step 1: Fold your fabric and lay the center fold of the pattern to the fold of the fabric. Now, we are making three pieces of fabric to be sewn into the cover. Yep,no zippers to sew! Note that in the picture above, a large quarter of the fabric had been cut off. I also prefer to use the right side of the fabric. Pin your pattern to your fabric to keep all the layers in place.
Step 2: Cut your fabric with 1″ allowance. 1/2″ is going to be the seam allowance, and the other 1/2″ ease is for easy insertion and removal of the cover. What I did was I marked 1″ off the pattern edges all around and cut. Do not remove the pattern from the fabric so that you don’t have to keep measuring 1″ off the pattern piece. Just cut the same size as this one.
Step 3: To make the back piece of the cover, we will need two pieces of fabric. First, mark a line and mark another line 3″ away. Make sure to clearly mark the red line as above as you will use this line to match with the other back piece.
Now, fold your line along the red line as pictured above and lay your pattern on the fold. I then flipped my fabric and lay my pattern piece on the right side. The extra 3″ will be the overlap on the back like a typical pillowcase would have.
Step 4: For the third piece, mark a line, and lay our center fold on the line. Again, clearly mark the red line. Now, cut your fabric with 1″ allowance all around. Note that I cut my second piece on the right side, I cut my third piece on the wrong side. If you cut your second piece on wrong side, you should cut this third piece on the right side.
Now, you should have these three pieces. 1 front piece and two back pieces.
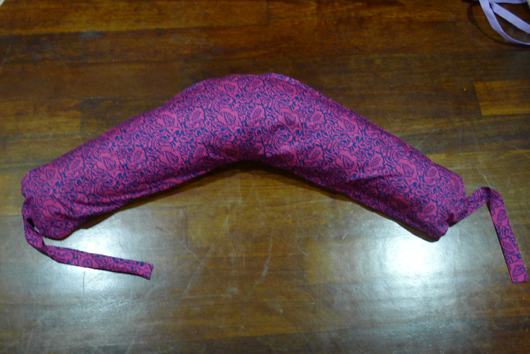
Step 5: To make the tie straps, take your pillow and place it around your belly. Measure the gap, and add 7″ to the measurement. This will be the length of your ties. For me, the gap is 11″ so, my end length will be 18″.
Step 6: Now, cut 2 pieces of 18″ x 2″.
Prepare the ties
Step 1: Fold the fabric lengthwise in half, right sides together and sew 1/4″ from the edges. Only sew the top and the sides. Leave the bottom open.
Step 2: Snip off the corners and turn the tube inside out. Poke the corners out to make it nice and sharp.
Step 3: Press the tubes flat and that’s it!
Sewing the pieces together
Step 1: Finish the straight seams of the two back pieces. To do so, fold 1/4″ of the edges, twice to conceal the raw edges. Then topstitch 3/16″ from the edge.
Step 2: Now is the time to assemble the two back pieces. Remember the red lines u made earlier? Overlap the two back pieces using the red lines as meeting point. Pin them in place. Now, let’s pretend they are one piece of fabric.
Step 3: Take the front piece and the back piece and pin them right sides together. Sandwich the ties between the two fabrics at the ends of the pillowcase (midpoint of line C in the pattern piece). Sorry, I forgot to take pictures of this step onwards, because I was too excited to finish the project!
Step 4: Sew all around with 1/2″ from the edges and turn it inside out!
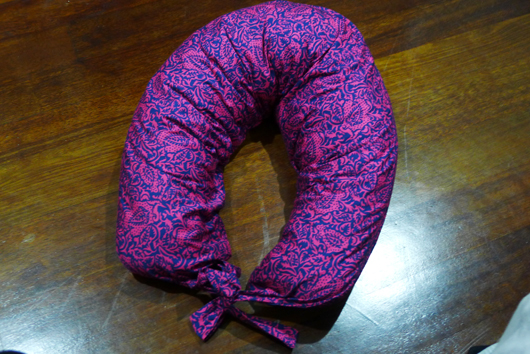
Stuff your pillow into the case and voila! My dear, YOU. ARE. DONE! Enjoy your pillow!
Good luck! Let me know if you have any questions 🙂




Is there anywhere on learning to make DIY pillow
For info on pregnancy n breastfeeding diet..do visit my site
http://www.mamasyafi.wordpress.com
I’m excited to try making this pillow! I’m in the midst of my second pregnancy and have reached the point where I think I need more support while sleeping. I just used standard pillows during my first pregnancy, but this time I want to make something custom! I like that your design is simple and not too bulky. I consider my sewing level somewhere between beginner and intermediate so hopefully I’ll be able to figure out the pattern just fine. I’ll try to remember to comment about my results after I finish!
This pillow has helped me sleep during my pregnancy I feel like giving myself a slap in the face for not making it sooner! anyway hope your project will turn out fine. Do let me know the result! ;D